1) Packaging. What does packaging have to do with racing? Everything, especially in F1. Packaging engineering is one of the most important and difficult parts in designing an F1 car and this translates to Mini-Z. It's the proverbial conundrum of fitting 10lbs of stuff into a 5lb bag. Whereas the bulk of a full-scale F1 car is limited by aerodynamics, Mini-Z F1 is constrained by scale appearance and rightly so. The rear suspension of an F1 is a challenge, trying to cram as much suspension underneath that gorgeous scale body without anything hitting. Some bodies offer more room than others, and the latest models have enough room for a top spring and disk damper setup with some internal clearancing.
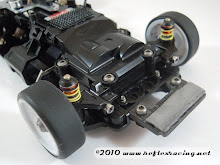
In that quest for an effective low profile rear suspension, I selected the 3Racing disk damper (same as upcoming R246). The problem that I couldn't identify until recently was that the lower disk damper translated to a lower damper arm on the motor mount. Both the Atomic motor mount and the 3Racing motor mount allow you to run the damper arm low enough to hit the rear battery when the suspension compresses under acceleration. The top spring damper mount on the PN motor mount is not adjustable and doesn't hit, but it can't readily accept a disk damper.
There are a few ways to check if you are running your damper arm too low. The easiest way to check is to inspect the area from underneath the battery box while working the suspension. If the damper arm looks like it's intruding into the battery box area, you're too low. Another way to check is to install the batteries, but leave the battery door off. If the rear battery pops out a little when compressing the suspension, then you're too low. With the battery door on, the damper post/top spring will abruptly move up instead of forward when compressing the suspension if the damper arm hits the rear battery, i.e. - you're too low. Finally, if you're noticing weird chunks missing from the center of the battery insulation after a big wreck, you're too low.
The net effect of this is that you will have no rear suspension compliance under acceleration, which is why I couldn't put any power down at the worlds. The deceptive part is that the suspension looks like it's working, aside from the strange upward movement replacing the forward movement when the damper arm hits the battery. This effectively turns the bottom disk damper spring from a disk tensioner to a rear suspension spring, if the suspension can even get past the initial shock of hitting the battery. I fixed the issue by installing 1mm spacers underneath the disk damper plate, raising the whole assembly and the damper arm once the disks/post were centered. 1mm fixed the rear end... I'll pause to let that sink in. A side benefit is that motor wire clearance is improved. Drawback is that you have to clearance the underside of the body for the higher screw heads, top disk and rear top spring damper end.
Speaking of top spring dampers, I currently use the PN side damper for this application because it's a good length, has screw preload, and lots of options for spring rates. I like the PN white spring. You have to aggressively file the sides of the rear damper end and clearance the inside of the body cowl to give enough roll travel, but I think it's worth it. Additionally, don't short yourself on rear ride height with the top spring preload or the axle spacers trying to dump the car. RCP is bumpy, and dragging hard parts will lead to inconsistent handling. I also like to sand down the rear corners of the battery door to points to give more squat clearance during cornering.
So now that we can accelerate, let's look at cornering and roll stiffness. I'm going to go against the grain, and say that the rear end doesn't need to be MR floppy for mod. The F1 is a heavier chassis, and I think that the roll stiffness of a side plate setup is more than compliant enough to handle the power with a couple of tricks. Old school tuning left various side plate screws loose. This WILL NOT WORK with grey chassis, as for some reason the screws do not grip the grey plastic as well as the clear plastic and will back out unless tight. I personally have moved away from this, since the side plates are the only thing that "locates" the motor mount and thus the rear axle and wheels in relation to rest of the chassis. Leaving them loose has led to inconsistent handling as the car struggles to stay "square".
I've got quite a few options in my pit box for dialing in the rear roll stiffness. Side plates include Kyosho carbon, Kyosho carbon thinned down to 60% width, and Mantis carbon in order of decreasing stiffness. In addition, I use the full plastic spacers/blocks that come with the Kyosho carbon side plates for full stiffness, but I have beveled versions of both front and rear blocks that I can use in different combinations to soften up the side plates by increasing the effective plate length (moving up the pivot point with the beveled front block), or relieving the rear tension on the plate with the beveled rear block (so it bends in more of a "C" shape than an "S" shape). If you don't believe these have an effect, you will if you install a beveled block on one side and a full block on the other… Side springs can also be employed, and I've cut the "tubes" out of an old plastic motor mount so that I can screw them onto the Atomic motor mount. The 3Racing and PN motor mounts have the tubes machined in. Using the side springs will also let you use the Kyosho tube dampers.
Other things to look out for with side plates include the dreaded tweak. While the grey chassis has addressed the molded tweak issues of the clear chassis, the Kyosho carbon side plates also have a slight tweak that you need to address. The Kyosho side plates are made identically left and right which means that any bend in the raw material will be in the opposite direction when mounted on opposite sides of the car. Most of the Kyosho carbon side plates I've seen have a slight upward bend when mounted on the left which means a slight downward bend on the right. This means a stiffer right side which leads to the infamous left tweak. A thin shim between the side plate and the motor mount will usually address this without having oddball steering bias in the radio that can have inconsistent side effects. The Kyosho side plates I thinned down don't seem to exhibit this tweak which means that they are just too soft or I wasn't perfectly even with my sanding. The Mantis side plates are made individually left and right, so they aren't tweaked, though the holes can elongate. With an aluminum motor mount, it's also cheap insurance to use a nut in addition to loctite to capture the rear side plate screw.